Tuesday, June 23, 2015

A Black and White Table Makeover


I purchased this little table at a yard sale for $3 .  It had an arborite top on it and the legs had been replaced with some home made ones but it was the very sturdy.  It looked like a miniature mid century kitchen table except the legs were wood instead of chrome.  It was first thing I ever painted with my DIY chalky paint about three years ago.  At the time I was really concerned about the paint adhering to the arborite surface but I went ahead and painted it anyway.


I distressed the top corners a bit at the time (the black area is the original paint job) and as you can see, the paint had stood up fairly well.  There are a few more little dings in the paint but considering how I've used it,  it's a wonder there is any paint left.  It's been used as everything from a side table to a play table for the kids to run their dinky cars on... and it's been three years. 


I wanted to give it a new look so I decided on a partial make over.  I painted the legs white.  Then I taped off the diamond on the top.  I just left the black distressed as it was and painted the diamond first with a base coat of DIY primer and then two coats of the white.


Then used tracing paper to transfer the image I hand printed out.


Using the tracing method gives you enough of an image but you can fix any missing lines when you paint it in by hand.


A little distressing of the image and a coat of wax to protect it and I'm ready to use it again..


Right now I'm using it a side table .


It makes a great place to put a book or my coffee in the morning.


This little table has so many uses, I think it will be around for a long time to come. 


Thursday, June 18, 2015

One piece... Three Projects. -part two - Desk to Tween Vanity

I few weeks ago I  updated a wash stand and had some left over pieces.  I wanted to show you how I use every single piece if I can and promised three projects from one piece. See the first project here.


That wash stand had a lovely little  tippy mirror on it that I couldn't use because a few of the spindle pieces couldn't be tightened enough.  However there was nothing wrong with the mirror itself so I wanted to find a new home for it. 


I repaired and painted a turn of the century ladies writing desk and chair last year but couldn't sell it because it was just too small for a desk by todays standards.  There definitely wasn't enough room for a computer and all the stuff that goes with it.   


This is how I married the two pieces together.   First I repainted the desk with a lovely soft white called Queen Annes Lace from BeautiTone .


Then I painted all the pieces that held the mirror together.


It's easier to scrape the paint off the mirror after it's dry than it is to tape it off.


I printed this postage stamp photo and used tracing paper to transfer it to the desk top, and drilled two pilot holes for the mirror spindles. 


At this point I did a dry fit to make sure everything was going to fit together.  You can see the fine lines where I traced my picture.


I  hand painted the picture and when it was dry I lightly sanded and distressed to make it look like it had been there for a long time.


Now I had to get rid of the blue inside.  It just wasn't right for a young lady's vanity.


Ahh... much better. Things are starting to come together.


I wanted to do something different with the seat so I found a bright pink bath mat on sale and used it to recover the seat. 


I painted the mason jars to add the finishing touch and I think I've created a vanity that any young lady would love.


Wednesday, June 17, 2015

Canada Day Mason Tea Light Holder

Every time I look through mason jar projects at this time of the year I see tons of pretty little mason jars painted with stars and stripes in red white and blue.   My friends from south of the border are really busy.


What I don't see is Canada Day mason jars and I kinda wondered why.  So I decided it's about time someone made them.  I'm so glad I did because I absolutely love  it.


First I gathered together a bunch of stuff because I wasn't really sure how I was going to make it.  I mixed a batch of my DIY chalky paint in red.  This little bowl is about a half cup. Once it's mixed I just keep it in a jar and it will last for a couple of weeks.


Then I washed my mason jar and dried it really well.  First I gave it a good coat of the white I already had mixed. 


While the paint was drying I measured a spoon and using pliers I bent it to hang down into the jar.


It will hang inside like this and hold the tea light candle.


I painted the back side of  a small maple leaf to use like a stamp, then painted the top and bottom of the jar red as well.


A little sanding of the raised areas and some jute twine around the top and it's done.   All that's left is to add a candle.


I love how it looks and I can't wait to make some more.  I think these would look great going up a set of stairs to a deck to light the way home after the fireworks,  or lined up on a mantle. 
Where would you put yours?

Thursday, June 11, 2015

Apple crate


I bought this craft style apple box a while back to use on my kitchen island. 


Even though it's cute with it's rustic look, it's not what I really wanted.  That didn't stop me from bringing it home though. I knew I would have exactly what I wanted with just a little paint.


Of course I used my DIY Chalky paint for primer first.


The paint colour I chose for this was Benjamin Moore's  "Lovely in Linen".  It's so soft and pretty. Just a hint of colour.


Once it dried I used a sanding sponge to distress the letters very lightly.


I love how it looks now. It's the exact look I wanted for this piece.

Wednesday, June 10, 2015

One piece... Three Projects. -part one -Vintage Wash Stand

 Sometimes I come across pieces like this vintage looking wash stand. It had seen much better days, but it came with a basin and pitcher.


Here it is after I started to dismantle the top .
See that little mirror.  It had my head spinning with  possibility.
It was missing a few pieces and was very wiggly. I tried  tightening it but could tell it wasn't going to be an easy fix, there was no way I was going to get it all back together in its original state.


After I took it all apart and tightened the spindles the base piece was quite sturdy.


I needed to fill the holes left by the spindles I had removed so I stuffed the holes with pieces of toothpicks and then smoothed over them with some wood filler and sanded a bit.


A coat of DIY chalky paint used as a primer and a top coat of Benjamin Moore's "Lovely in Linen" for  a pretty country look.  
I absolutely love this colour.  Such a soft grey with a very subtle green undertone.


It's now the perfect setting for the basin and pitcher that came with this piece.


Both pieces have a wonderful winter scene.


And both   pieces  are in excellent condition with not a single chip.


I have different plans for the mirror and the spindles.  You'll have to check back latter to see what I do with them.

Friday, June 5, 2015

Got wet towels?

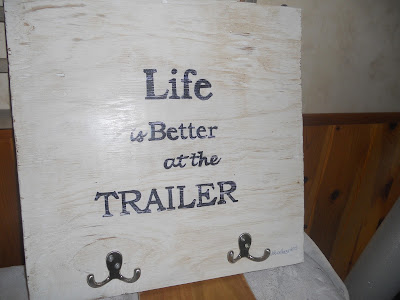
I've been working on a few bigger projects lately but managed to fit in this little sign that is to be a gift for a forever friend who had a trailer. She is one of those wonderfully beautiful people who seldom arrives from the city to enjoy her peaceful place without a car full of grandkids who want to have fun in the sun swimming and playing in the sand.


I remember at the cottage when we were younger,  thing that was lacking the most was a permanent place to hang wet towels.  They were hung over any convenient door knob or lawn chair.  To be honest they were mostly left on the ground or floor right were they were dropped. 


I thought a cool little sign/towel rack would come in handy so here it is.  I hope she loves it as much as I loved making it for her. It has a waxed finish to repel water so I'm hoping all those wet towels will find their way to the hooks.. What are the odds do you think,  If your were a gambling person would you put money on it... I know I wouldn't


Thursday, June 4, 2015

DIY Aqua Duck

Hi all... If you've wondered where I've been the last few day, I've been working on projects.  At the moment I don't seem to be very organized because I'm actually working on a few and don't have anything done yet. Funny how that works. 

Today I'd like to share something I've been using for a few years now when the kidlets are at the house.  I'ts a DIY aqua duck for help with hand washing. 


All you need is an empty plastic bottle and a pair of scissors. Make sure the opening at the top of the jar will fit around your bathroom faucet.  You want a nice tight fit.


Next peel off the label if you can.  This isn't necessary but makes it look a bit nicer.


Then using a grease pencil draw the shape of a spout on your bottle and cut it out with your scissors.


The next part is the trickiest bit.  I had to slice through the rim of the bottle with a serrated knife, but be very careful.  You want the opening here to be big enough that you can snap the bottle on and off your faucet spout but not so loose that it falls off when bumped.   I removed small slices until I had just enough.


Now you just snap it over your spout when it's hand washing time, and the kidlets can easily reach the water.  The best part of this is not having to lift kids up to the sink.  And they remind you to let them wash their hands so they are creating a good hand washing habit.


As you can see from the date on these pictures, I have had my aqua duck in use for two years now. Was it worth the ten minutes it took me to make it.  Heck ya.  Over all this is a huge success.  Way less mess in the bathroom and it helps the little ones develop  a bit more independence  . Of course you can buy a real aqua duck here , but they are anywhere from 10 to 20 dollars, and mine cost me .... nothing.