Showing posts with label Signs. Show all posts

Friday, June 26, 2015

Rustic sign for the Cottage

This is a little welcome sign for the front door of a cottage that I made. I used my usual transfer method for the lettering but it was really easy to do this one.


All I did was to put a barely there whitewash effect on the board with a watered down primer to cover the board.  I was dry in about 15 minutes the coating was so thin.


Instead of painting the lettering I used a jumbo size sharpie marker to fill in the lettering.  These are great markers for this because they have a wide point at one end and a wedge at the other.  


Then I gave it a little dry brush technique over the whole board to age it just a tiny bit and protected it with a coat of natural wax.  The jute twine hanger gives it a rustic touch. 

Friday, June 5, 2015

Got wet towels?

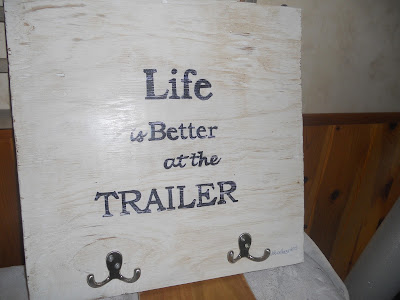
I've been working on a few bigger projects lately but managed to fit in this little sign that is to be a gift for a forever friend who had a trailer. She is one of those wonderfully beautiful people who seldom arrives from the city to enjoy her peaceful place without a car full of grandkids who want to have fun in the sun swimming and playing in the sand.


I remember at the cottage when we were younger,  thing that was lacking the most was a permanent place to hang wet towels.  They were hung over any convenient door knob or lawn chair.  To be honest they were mostly left on the ground or floor right were they were dropped. 


I thought a cool little sign/towel rack would come in handy so here it is.  I hope she loves it as much as I loved making it for her. It has a waxed finish to repel water so I'm hoping all those wet towels will find their way to the hooks.. What are the odds do you think,  If your were a gambling person would you put money on it... I know I wouldn't


Wednesday, May 27, 2015

Custom Porch Sign

My brother in law just finished building his covered back porch.  It's a great little spot where all  the guy's like to hang out.  Kind of a man cave without the cave aspect.   It's on the north side of their house and surrounded by trees so it's always in the shade and will be  a cool refuge on hot summer days.  My husband came up with the idea to make a custom sign that said "The Place to be" as a porch warming gift.   After mulling it over for a while, this is what I came up with. 


It's  a piece of plywood about 18" wide and 21" long.  It was left in the scrap pile at a construction site.  My man sometimes brings me cool things like that.  He's awesome.


I painted one coat of DIY chalky paint and then used some copy paper to transfer the lettering and the Molson Canadian maple leaf logo onto the board. 


After filling in the lettering with a fine paintbrush and black craft paint I painted the leaf.  Then I used a wet cloth to distress the corners quite heavily.  I wanted this to look like it had been sitting in a guys workshop for a while.  A few flicks of (accidentally) splattered red paint help the effect.


I finished it with a coat of dark wax.  It's amazing how adding dark wax instantly takes away the just made look. 

I'm really happy with how it turned out and I'm sure it will look great on the man cave porch. 


Antiques or just old stuff....it's all good

I had a board and it was like having money burning a hole in my pocket.  I had to do something with it.  I had a little of the Minwax Provincial stain I used for my coffee table makeover so I stained it.  Because the wood was really rough in spots and smooth in others  it took the stain kind of uneven.  I liked the way it looked though.


While it was drying I browsed through a bunch of pinterest signs.  I didn't find anything I wanted to copy but I did get an idea.

I used my word pad to print out my lettering. Then I transferred it to the board by covering the back side of the paper with chalk and tracing over the letters on the front of the paper to leave the chalk print on the dark stain.  This transfer method is really easy and I like it for anything on a dark background. 

I filled in the lettering with some DIY chalky paint and a small artist brush.  The stain was a little bit tacky while I was painting and when the paint dried I found there was a  bit of bleed through.  It made the lettering look old so instead of another coat I just left it.  I didn't even distress this one because I loved it the way it looked.


I love how the letters look weathered without distressing. What a happy accident.


So what do you think.  Should I repaint the letters or leave it as is. 

Monday, May 25, 2015

Laundry Room signs

I wanted to have a few little signs for decorating my laundry room and this is what I made.  They are free hand instead of stenciled and I think they are kinda cute.  Very easy projects are my favorite and these fall into the easy peasy category. Just a few boards a little paint and taadaa.


Thursday, May 21, 2015

Poster Transformation

My husband has had this Beatles poster for as long as I can remember.  If you ask anyone who knows him they will tell you he is obsessed with the Beatles and their music. 


I found a poster at the thrift store for a couple of dollars that had nothing to do with the Beatles, it was an Anne Geddes, but it was the same style as this one.  They are made from chipboard and have the picture glued to the front and a glossy coat added to the top. You know the kind I'm talking about. The Beatles one is 24" x 36" and the one I found was 12" x 36".


My first attempt at this was a total fail.  I sanded the top of the picture thinking it would help give it some tooth.  Once I had the primer on the whole thing started to peel.  The shiny surface on these posters is really a plastic coating.  Tip: do not sand the plastic coating. 

In hind sight the DIY chalky paint I use as a primer probably would have stuck to it just fine.
Oh well, not one to be deterred I just flipped the board over and filled the little slot at the top for hanging with some wood filler and sanded it smooth.

A coat of primer, and a coat of white paint gave me a nice clean surface for the lettering.  For this project I printed it out from the  computer and transferred them to the board. Just cover the back of the  printed pages with pencil, flip them back over and then trace them onto your project.  Then using a small brush, fill the letters in with black paint.

Once dry I had to give it three coats of sealer to get a shine similar to the Beatles poster.  I think they make a good pairing, and hubby was pleased with what I made for him.  These are going to look great in his music room/office. 
Now that I know  these old posters will make a great surface for other projects like this, I'll definitely be keeping an eye out for them. woo hoo


Monday, March 9, 2015

Market Sign

I apologize for not being around for a while.  I have been recovering from surgery and dealing with an infection at the site if the incision, so actually I've been doing a lot of nothing. I did work on a few little projects though.


I have this little wall space that is the bulkhead over my kitchen cabinets.  It isn't really a lot of wall so you cant hang a picture, and I dont' have a pile of pretty plates I can put there.  I've been dwelling on it for some time now and decided a board would fit there really well so a few  signs seemed the logical thing.  Going through my stash the other day I found two signs that I had painted years ago when I sold fresh eggs and rabbits.  They hung at the end of the drive for years and were weathered and discoloured.  In other words perfect. They got me thinking ... If I could hand paint a sign fifteen years ago I could certainly paint something now. I don't own a cricut or anything like it so freehand is the way I've always done things. 


I wish I had taken some before pictures but a board is a board.
I picked  a board that looked like the right size and sketched the lettering on with a pencil. 
I painted the letters directly onto the board , because I thought I wanted the background natural but when they were done I hated it .  
To fix it I painted over the letters with some white chalky paint, then repainted over the letters with some the black again.  It was better but looked like I had just painted it.  duh..

 
I grabbed some white vinegar and sprinkled some large droplets over the surface of the board and with a cloth I immediately rubbed with the grain to take some of the layered paint off.  I used a sanding block to take off a bit more until I was satisfied with the look and then covered the whole thing with some paste wax for dark furniture.  The dark wax is what gives it the "not just done" look I wanted.


It's the perfect fit  for the area above the stove and I wish I had done this years ago.  I love it.


And here's this little "eggs" sign I made about fifteen years ago.  You can't duplicate the wear that wind and rain create so this little treasure is perfect. It sold a lot off eggs, and the cash bought a lot of chicken feed. It's a  hard working little sign that deserves a place of honor above the fridge. 


Feel free to leave me a little note. I'd love to hear from you.