Wednesday, May 13, 2015

Vintage Mod Podge?

I thought I'd share a few of my earliest mod podge projects today.   I did these when mod podge only came in one type. No sparkles, no matt finishes, just plain old mod podge.  I think you will agree with me that this stuff really stands up to the test of time . 


I had an old suitcase that was really banged up and  I almost tossed it... this was back in the day when I wasn't repurposing everything.  Of course I don't have before pics of it because I had never  heard of a digital camera, a blog ... or a computer either for that matter.  I'm talking early 1970's.   I was into gardening and décor magazines back then so I started by cutting out a ton of pictures and trimming them out so no background showed in the pictures.  Then using my mod podge I completely recovered the suitcase with a collage of my favorites.


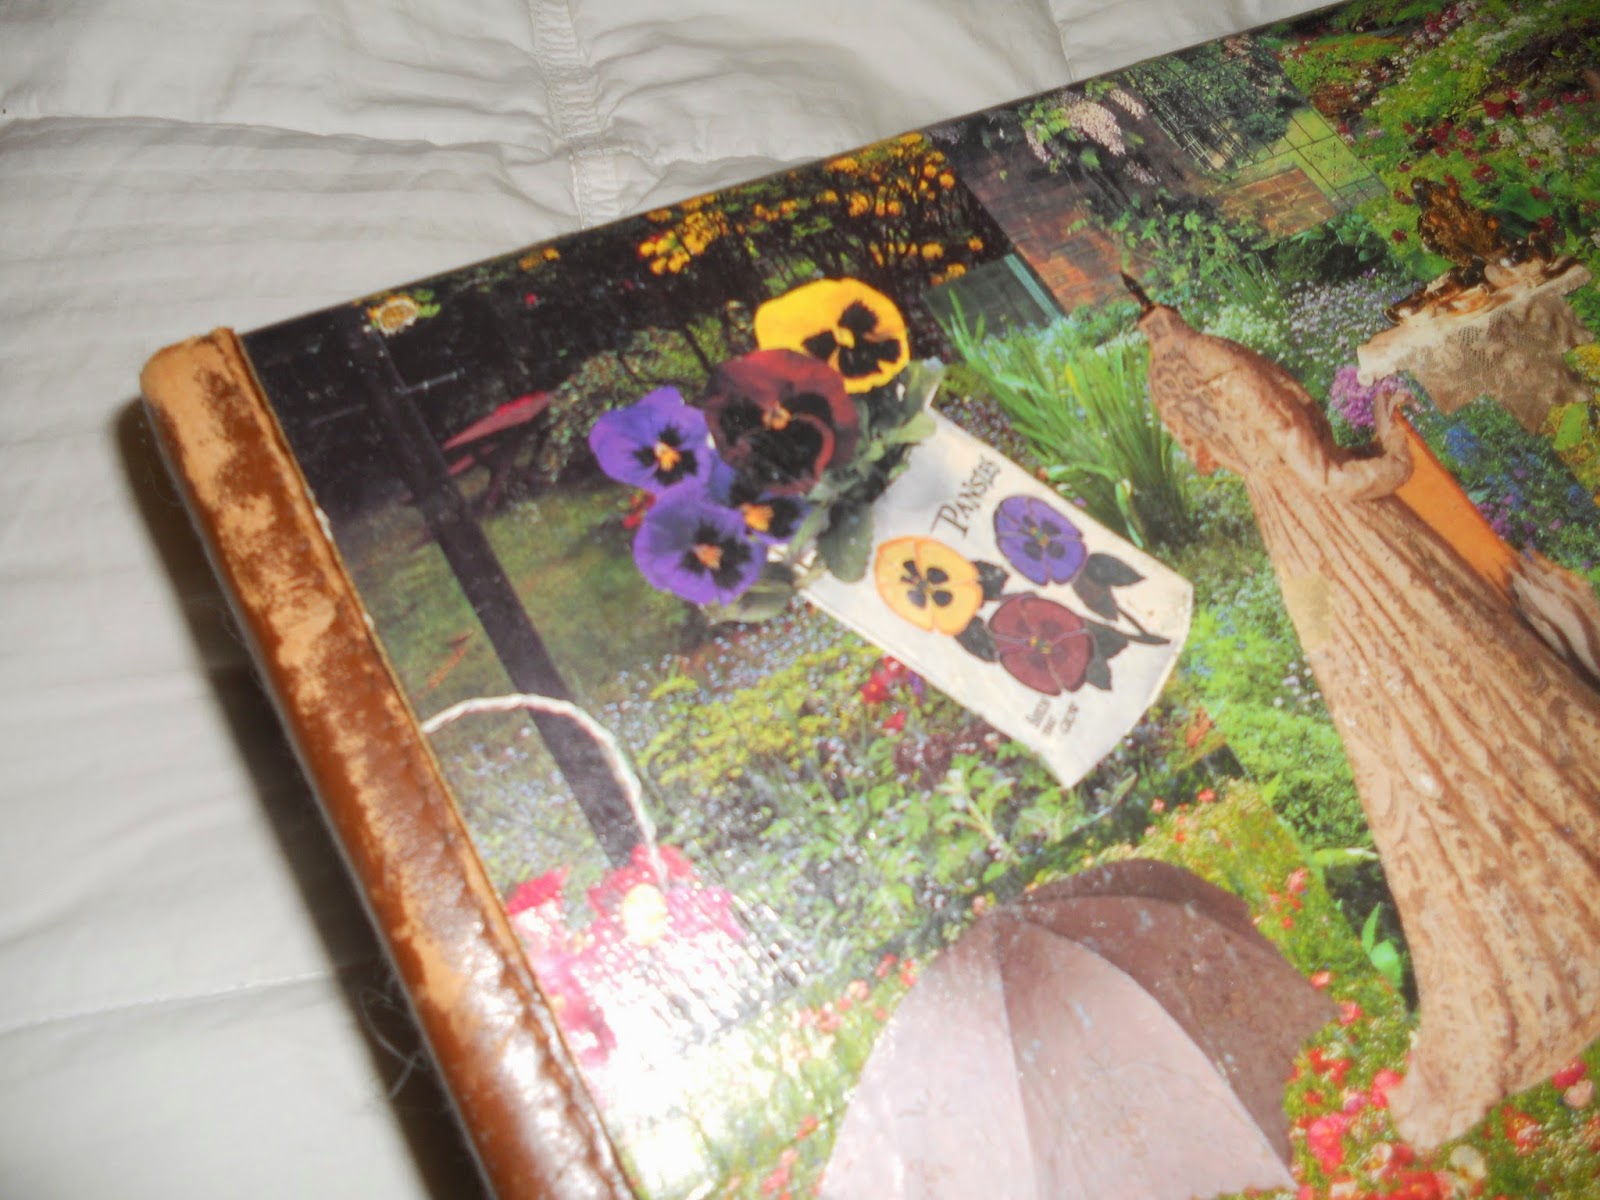
I think you'll agree that after more that 40 years this looks fabulously shabby.  It's one of my favorite items.

Then around the mid 80's my wonderful husband had this guitar case that was battered and scratched and had seen better days.  I thought it needed a facelift so together we spent hours going through his music magazines and searched for  just the right pictures to showcase his love of rock music and his favorite musicians.  Here's what  I decided to do with the case.  Instead of a full coverage collage I just kept gluing until I was happy with the final result.  I have to tell you this guitar case has endured almost 30 years of hard use and is still standing up well. 


I love that this guitar case has become one of my hubby's favorite treasures and that both these items have endured the test of time. 

Tuesday, May 12, 2015

Making a Diaper Wreath

Have you ever made a diaper cake for a baby shower. I have and they can end up being quite costly ..so I was looking for an easier less expensive version for a gift.  It seems like there are so many baby showers to attend when you have a very large family. 


I decided to try the diaper wreath.  These are a perfect size and can be used as a decorative accent on the nursery room door or wall.  I choose  size two diapers so they can still be used after the wreath has been displayed for a month or so after baby's birth. 

I could have used a foam wreath form but I  made my forms instead.  It's really easy.  Cut two wreath shapes for a piece of corrugated cardboard..  I used a paper plate for the outer circle and a cereal bowl for the inner circle. 

Glue your two pieces together making sure the lines in the cardboard go crosswise to each other. This makes your wreath form stronger and less likely to bend.

Next I wrap the form with a satin ribbon from the dollar store.  You won't see the form once the diapers are added so this step probably isn't necessary but it does make it easier to slide your diapers together when they are wrapped around the form.

Next cut a bunch of ribbon pieces for attaching the diapers to the wreath. You will need a piece about 6 to 8 inches long for each diaper, and the number of diapers will depend upon the size of your form.

Now you can start adding your diapers.  Open each diaper and slide it over the form. Now tie your ribbon around the diaper as close to the wreath form as you can.   Just tie a good double knot and curl the ribbon ends. This will create a pretty circle of colour around your wreath.  Keep adding diapers until your wreath is complete. Push them together as tightly as you can to get a full wreath the doesn't have gaps.


Once all the  diapers are added to the wreath you can start adding your extras.  Tie then to the wreath using the same curling ribbon you did to add the diapers.  You can roll up tiny wash cloths, little socks, and tiny undershirts.  I like to add, soothers, booties, spoons, teething rings, small stuffed toys and rattles. Small travel size containers of bath items fit nicely as well.


You can customize your wreath with a theme or just with colour options like I did with this batch I made.  As a finishing touch I added a bunch of curled ribbon to the center of each wreath.  You could add a decorative center piece or even the child's name printed on a ribbon if you know it.


Whether you know if it's a boy or girl, or just going gender neutral this is a great gift idea that is sure to be appreciated. 


Friday, May 1, 2015

Pretty country style coffee table.

 
I purchased this coffee table at a yard sale last fall. It was part of a package deal for $40 that contained a large quantity of painting and craft supplies from an artist who was downsizing.  I originally went for the supplies, but loved this table ... a lot... and could picture it after receiving a little TLC.  I had anticipated having to pay over $40 for all the paint... there was a ton of it, so I consider this table a real bargain.


Of course it was like everything else  I plan on doing.  It took forever for me to actually get to it.  KC kitty didn't care though. She likes everything the way it is.


Last weekend we had some lovely warm sunshine happening so it was time to drag this baby out to the deck and get busy.
I have such a lovely work space when the weather co-operates.
This picture is closer to the real colour .... it had an orangy tone to it I didn't like.


I spent about an hour with my palm sander and took the top down to some really aged wood.  It had some marker and coffee mug stains so I'm thrilled at how clean the top turned out. 


Once I wiped it down really well with a damp micro fibre cloth to remove all the dust I brought it into the kitchen and put it up on the island upside down. If you follow me at all you know I usually just paint all my pieces so this project is a little different for me.


First the legs and skirt got two coats of white DIY chalky paint.  I didn't bother sanding this part first because I knew there'd be no problem with this paint sticking.  It's what I use for a hard core primer.


I let the paint dry well over night and then the next morning I gave the top a good coat of Minwax stain in Provincial.  I love the colour of this stain.  It's richly dark but still lets all the grain show through.  Notice there is no orange tone. 


Once it was dry I finished the top with a coat of Minwax shellac.  It's what I had left over from a previous project and I always try to use up what I already have. 


I love how it turned out.  It's really beautiful with a golden glow, and all the dark areas really pop.  I loved this table right from the start, but now I'm head over heels. 


Tuesday, April 28, 2015

Vintage Window makeover


I've had a few of these old windows hanging around for a while and finally decided I needed to do something with them.  

They were very dirty and had hardly any paint left on them.


I gave them a really good scrubbing with warm soapy water to get all the grunge off and then I gave them a rinse with some bleach added to the water to make sure there was no mold.


The putty holding the glass in was dried out and broken up.  I removed the broken bits and the glass was still nice and tight in the frame so it didn't take much to cover the edge.  I just used a bit of wood filler.


 I primed the window using some of my left over DIY chalky paint in black.  Once it was dry I painted it in this pretty grayish blue. 


I finished them up with a coat of dark paste wax and added some pretty white hooks


I had such a hard time taking pictures because it was such a rainy dark day.


This would look so pretty in an entry.  Maybe displaying some family photos behind the glass.
The nice big hooks would be great for coats and hats,  and little side hooks for keys or purses.

It would be wonderful in a bathroom for towels and robes too. 


   I  really like how this one turned out.


What do you think.  Entry or bathroom?  Or maybe you have another idea.  I'd love to hear it if you do.


Monday, April 27, 2015

Pantry from Cheap Sears Bookshelves Part 2

A while back Ages ago I started a project to create a pantry space near my small kitchen to help supplement the tiny amount of cupboard space I have. You might remember it if you've been following along, if not you can find Pantry from old Sears bookshelves Part one here.

Well let me tell you what happened.  I got the shelves stacked together and being in desperate need they ended getting filled up with pantry stuff. Then winter hit hard,  I went into hospital and had a total knee replacement done,  I was busy recovering and doing my physiotherapy.... And .... time just flew by..  

Spring has finally arrived, the snow has melted and it's getting warmer every day. I'm walking without a limp and am happily getting back in the swing of things.  ...those ugly bookshelves are full of stuff and staring at me like I completely forgot about them.  I keep staring right back, but I've finally realized  I cannot live with the guilt of an unfinished project any longer.  Something needed to be done.

I was babysitting a little fellow but he had just gone down for a nap, so I knew I had approximately 1 hour.   I immediately dug the hinges I had purchased for this  project out of the bottom of the junk drawer (they were at the very bottom) and brought in the shutters I was going to use from my stash. 


The shutters had been separated for a previous use so I re-attached them using hinges in the middle and then I hung the shutters to the shelves using the same style of hinges.  Nothing fancy just little 2" hinges from the hardware store.  The doors were an exact fit side to side but not top to bottom.. I left the bottom up a bit so give it good clearance and I will have to find a solution for the top.


Then I added a couple of magnetic latches on the inside to keep the doors shut. 


About this time the little fellow I was looking after woke up from his nap.... so I guess part two of this project is done..


So I don't really have a lot more accomplished,  and you will definitely have to stay tuned to see what else I have  planed next.  At least the shelves are covered and  I promise not to wait three months before I get to part three. 


Sunday, April 12, 2015

Mason Jar Soap Dispensers.


I love mason jars.  I've been wanting to try some of the  ideas for repurposing them that I have saved to Pinterest, and I finally got around to making a soap dispenser.


I simply followed   these easy direction from "Love grows Wild". Her tutorial made it so simple and I didn't need any special tools.  Just some pumps that I cut off the top of some empty soap containters and a small nail and hammer. 


I made two hand soap dispensers, one for my bathroom ....


and one for the kitchen. Than I switched them  because I made a third for my dish soap and I wanted the two pumps   in the kitchen to match.


This was with the hand soap in the kitchen. Nice, but I wanted another one for my dish soap. 


That's better.  The stand is a plate and a candle holder that I picked up at the thrift store. I simply glued the two together.   This is so much prettier than your dish soap container on the counter.  The little cheese shaker contains baking soda for scrubbing hard to clean messes and keeping my sink clean.  It works just as well as comet without the nasty chemicals.

I can't believe how easy these were to make. I'm so happy I finally decided to try this. 

Now I just need to work my way through all the other mason jar projects out there. 


UPDATE:  I decided that I wanted a little more of a matched set, so I added a small mason jar with holes punched in the lid for my baking soda and gave all the lids and pumps a coat of black paint.  I'm so glad I did.


It makes so much sense with the black and glass pedestal.  I'm loving the way it looks on my counter.

Friday, April 10, 2015

Kitty cat storage.


I absolutely love my kitty.  What I didn't love was the big bag of dry cat food sitting on the floor of the closet.  It inevitably gets  spilled and I was tired of cleaning up the mess.  The simplest solution of course is to pour the bag of food into a bucket with a lid.  I couldn't just have a plain bucket of course so I had to paint it.


I put about 2 tbsp. of plaster of paris into a little bowl and mixed it to a paste with a tablespoon of water. To the paste I added about 1/4 cup of regular acrylic craft paint. 


I used a sand block to gently rough up the surface a we bit and then painted the bucket.  I left the upper part of the bucket white because I figured it get too much handling to not chip and start looking.... well .. ugly.  Going to the ridge gave it a nice clean line.


When the paint had dried for about an hour I used a piece of dowel to "write" on the bucket. What it actually did was remove the paint to let the plastic show through. I wouldn't have been able to do this once the paint had cured for a few days. I could have used chalk or white paint to label it then.  This chalky paint  is pretty durable on the plastic..

There are some really great  paints out there that are great for using on plastic, like the Fusion spray paint,  if you would like to use them, but for me it's all about saving money and using what I have on hand. 
It's been over a week now and I am very happy with how well the DIY chalky paint holds up.  I'll be using it to make a few more of these buckets to solve some small storage problems.

Thursday, April 9, 2015

Scented wax or essential oils?

If you have a scented wax warmer but don't like buying the expensive wax refills, here's an alternative that is safe and inexpensive.


I have this pretty little warmer. It was a gift and it came with a package of the little wax pieces to make the house smell fabulous.  But the refills aren't that cheap.  I could just get some from the dollar store I suppose but I don't like burning a lot of that type of wax in the house because I don't know what kind of a toxins they release when they burn.

I came up with an easy safe alternative to store bought scented wax.
I put about 2 tbsps. of grated beeswax and a few drops of essential oil in the warmer.   It's that easy, and it works great.  My favorite is lavender , but of course your options are endless.  Just use your favorite essential oil or oil mix  and your home will smell fantastic, and the air will be safe to breathe.


 That's what I call a win, win.