Showing posts with label furniture. Show all posts

Friday, May 1, 2015

Pretty country style coffee table.

 
I purchased this coffee table at a yard sale last fall. It was part of a package deal for $40 that contained a large quantity of painting and craft supplies from an artist who was downsizing.  I originally went for the supplies, but loved this table ... a lot... and could picture it after receiving a little TLC.  I had anticipated having to pay over $40 for all the paint... there was a ton of it, so I consider this table a real bargain.


Of course it was like everything else  I plan on doing.  It took forever for me to actually get to it.  KC kitty didn't care though. She likes everything the way it is.


Last weekend we had some lovely warm sunshine happening so it was time to drag this baby out to the deck and get busy.
I have such a lovely work space when the weather co-operates.
This picture is closer to the real colour .... it had an orangy tone to it I didn't like.


I spent about an hour with my palm sander and took the top down to some really aged wood.  It had some marker and coffee mug stains so I'm thrilled at how clean the top turned out. 


Once I wiped it down really well with a damp micro fibre cloth to remove all the dust I brought it into the kitchen and put it up on the island upside down. If you follow me at all you know I usually just paint all my pieces so this project is a little different for me.


First the legs and skirt got two coats of white DIY chalky paint.  I didn't bother sanding this part first because I knew there'd be no problem with this paint sticking.  It's what I use for a hard core primer.


I let the paint dry well over night and then the next morning I gave the top a good coat of Minwax stain in Provincial.  I love the colour of this stain.  It's richly dark but still lets all the grain show through.  Notice there is no orange tone. 


Once it was dry I finished the top with a coat of Minwax shellac.  It's what I had left over from a previous project and I always try to use up what I already have. 


I love how it turned out.  It's really beautiful with a golden glow, and all the dark areas really pop.  I loved this table right from the start, but now I'm head over heels. 


Friday, February 20, 2015

Favorite Stenciled Furniture

I love stenciled furniture.  I've been thinking about doing a couple of small dressers as night tables and I've been looking for some inspiration.   Here are a few ideas I have been mulling over. I'm sure any of these pieces could be downsized and customized to create some unique bedside stands. What's your favorite? 


This dresser stenciled with locations is fabulous.  I think I would choose some of the favorite places I've been or are still on my wish list.  You can see the details here : http://www.thediyvillage.com/2012/01/streets-and-city-word-art-dresser.html


This Paris skyline done by "Shab to Fab" has stuck in my memory ever since I first saw it over a year ago. I believe she hand painted this piece, I wish I was that talented.  I love the contrast of the white on black, it is so intense.  Such a beautiful piece.   See it here: https://www.facebook.com/ShabTaFab/photos/pb.418440068230533.-2207520000.1423670704./490270657714140/?type=3&theater


My husband is a musician who is also a huge Beatles fan.  This dresser would make great storage in his music room for all the paraphernalia that goes with playing in a band.  Find the story behind this dresser here: http://www.justalittlecreativity.com/2012/07/from-drab-to-fab-beatles-dresser.html


I love this cabinet painted with Marilyn Monroe quotes. Unfortunately I couldn't find a link that worked for this one. If anyone knows where it originated I would like to give credit where it is due.


There are a million ideas out there when you start looking.  What I need are some new night tables, so I am thinking a couple of little dressers like this Rast dresser from Ikea  Painted black with John Lennon song lyrics on his side and Marilyn quote on mine. 


I'd love to hear from you.
Leave a comment on  todays post.

Tuesday, February 10, 2015

Twinkle Twinkle Little Star

I found this little rocking chair at a yard sale and it was right in my price range.  I think I got the chair, the two tall plant stands and a few other smaller items for $15 total. 


The woman having the sale said  it was her sons and he was in college now. I was quite happy that it was sturdy and had no broken rungs.  It was in really good shape.


I used a bit of vinegar and water to get rid of a little grime, and a blob of peanut butter took care of the little sticker. 


Two coats of the same peachy pink DIY chalky paint that was left over from a chalk board I had just done , and this little beauty was ready for it's new home...... almost.


I chose Twinkle Twinkle, because this rocker was for my granddaughter and she is definitely my Little Star.

I'd love to hear from you.
Please leave a comment and tell me
what you think of todays post.

Saturday, January 17, 2015

A Coffee Table Facelift


I took this coffee table as a trade for a side table and mirror that I painted  last winter. 


It was nice and large, and it had one of those tops that lifted for occasional dining.    


However;  it had been used  by two little girls who loved to do their nails and crafts in front of the tv.  There were nail polish spills,  and water marks,  some marker and even a few scratches.  There was even a little piece of the veneer missing on one side. 
 
This great table needed a facelift.  I started by giving the whole thing a really good clean with some all purpose cleaner, and then a rinse with some water and vinegar.  
 
Then I mixed up a good sized batch of my DIY chalky paint in this great graphite colour.  It was a mis-tint that I picked up on sale so it didn't have an actual name, but graphite works for me.  Its the exact colour of pencil lead.  I kind of painted it backwards though. I really should have done the inside first.
 

I gave it two coats of chalky paint and then two more of a poly top coat.  In spite of the odd approach to the paint job I think it turned out quite nice.    It has since found its forever home with family looking for a table to use with a sectional sofa.  This one was the perfect fit.
 

It wasn't until after it was gone that I realized I hadn't taken a final picture.  I really have to start staging things for that final glam shot.  These pictures  really don't do it the justice it deserves.


I'd love to hear from you.
Please leave a comment and tell me
what you think of todays post.

Wednesday, December 17, 2014

A Perfect Pair, Cabinet makeover.


Sometimes things  just come together, even when there isn't a plan.  That's what happened with these two pieces.


A few years ago my hubby was given this great cabinet from someone remodeling a cottage.  They really asked him to take it to land fill, but he knows better.
I used it for toy storage in the playroom for quite a while, but for a long time it was just collecting dust.  It's really solid so I knew it was going to get a new life eventually.


It was pretty beat up but would make a fabulous liquor  cabinet  change table   games storage  well you get the idea.  
See the  beautiful grey plush lining on the inside walls , and cubbies at the bottom would be a great place for baskets.  I finally decided to just go ahead and paint it.  


I  cleaned it up with some water and vinegar, and gave it two coats of my home made chalky paint, a nice grey/blue that I think goes well with the fabric lining.  Then we used it for a  liquor cabinet for a bit, but it never really felt right to me.


Then in steps this book case I got at a yard sale. Another item lost in my stash, covered in dust. It had both its shelves intact, and a really great shape. I cleaned it up,  patched a few missing bits with wood filler and painted it the same blue chalky paint as the cabinet.  I think these  pieces knew they belonged together. 


In a bedroom, office or even a kitchen for extra storage  the uses for a set like this are endless. I think they look perfect together. 


Monday, December 1, 2014

Sideboard makeover. with DIY chalky paint recipe


This area in my kitchen was being used for a coffee station with extra storage for my tiny kitchen.  My daughter in law gave me the sideboard about a year ago and it fit here perfectly but it needed some colour to get rid of the dated look. 


With some help from hubby we lifted it to my work table and  remove all the drawers and doors. I had no intentions of laying on the floor with a paint brush in hand  to paint the bottom edges. Maybe twenty years ago but not now.


After a good wash to remove any grease  I got busy painting.  The great thing about my DIY chalky paint is not having to sand or strip before using it. It sticks to almost anything. This is the outside after the first coat. Luckily it only needed 2 coats because the paint has awesome coverage, even when using  a light colour over dark finishes.


I painted the inside as well. I figured it would get a lot of use so painting the inside a lighter colour would make it easier to find things.   (And to be honest it will inspire me to keep it tidier as well :)


Much better.


I took the handles off the doors and raised them off the work surface by setting them on a few plastic bowls.  I painted the hinges because I didn't want them to stand out.


I painted the body  with a lighter shade of the blue, by adding 1 part blue to 3 parts white.  I used the full tint blue for the top of the buffet, the door fronts and the shutters and shelf.


This is the sideboard  all finished with  clear furniture paste wax to protect it.
 I always reuse the hardware as long as it's a complete set. 


I love these little glass jars I got at a yard sale.   And of course a chocolate and a vanilla candle will make everything smell awesome as well.


These tins were my grandmothers. The dark blue tin always had buttons in it and the light blue one still has a little label on the lid that says ribbons and bows.

.


And of course I love the old canning jars .


This is what I finished with, a nice coffee bar storage area, just like I wanted.


This is my DIY Chalky Paint Recipe

Mix 1/4 quarter cup of Plaster of Paris (you can get small containers of this at the hardware store)

with 1/8 cup of water until smooth.

I put mine in a plastic container with a lid because it will keep for about a week if covered.

Next add about 1 cup of you wall paint and mix thoroughly. Any acrylic or latex paint will work but I use the cheap stuff. Stay away from paint and primer combo's

Now paint.  This will stick to any surface. I've even painted glass and metal with it and had good adhesion. 
If you are painting walls ie:panelling with this , just use it as you would a primer and then do your second coat of paint right from the can.  It works amazingly well.


I'd love to hear from you.
Please leave a comment and tell me
what you think of todays post.


Wednesday, November 26, 2014

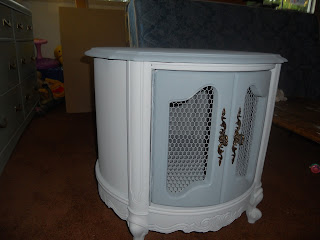
Barrel Shaped Side Table

I found this barrel shaped side table at a yard sale last summer and really couldn't  pass it by.  Some things just follow me home. Does that ever happen to you?


It has such beautiful details on the bottom edge and on the legs, as well as such pretty little feet.


The door has this great chicken wire detail along with just the perfect hardware.  I absolutely fell in love.  It went straight to my work room from the truck. All it needed was the perfect colour.
 
 
I started by removing the hardware and giving the whole piece inside and out a good wash with some vinegar and water.
 
I mixed one part of this gorgeous blue paint with three parts of white and made up my chalky paint mixture.
 
I painted the inside with the lighter blue. Have I said how much I love this colour.  Once the inside was dry I gave the outside, including the chicken wire, a coat of the lighter blue as well.  It's easy to paint the wire. just be sure to use a very dry brush to keep it from clumping up and dripping.
Once it was completely dry, about an hour, I gave it a second coat of paint.  The main part was the light blue mix, but  the door and top were painted with the original darker blue.
 
I finished it with some natural colour paste wax. I always use  Minwax furniture wax but I think any paste wax would do.
 
I used it's original hardware because the detail was so perfect.


What do you think?  Isn't it beautiful? 


Using 3 parts white with one part of the original colour makes it easy to do any piece in a two tone like this.  There is never any worry that the colours won't be a perfect match.


This chalky paint takes the paste wax really well and buffs up to a nice soft shine.


This table didn't take long to find it's forever home.  I was a little sad to see it go, but  I imagine it being enjoyed for a few more generations instead of being landfill and that makes me happy.


I'd love to hear from you.
Please leave a comment and tell me
what you think of todays post.