Wednesday, November 26, 2014

Barrel Shaped Side Table

I found this barrel shaped side table at a yard sale last summer and really couldn't  pass it by.  Some things just follow me home. Does that ever happen to you?


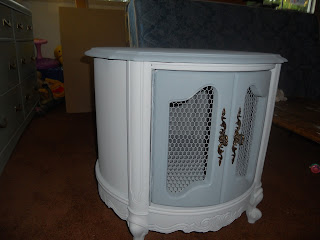
It has such beautiful details on the bottom edge and on the legs, as well as such pretty little feet.


The door has this great chicken wire detail along with just the perfect hardware.  I absolutely fell in love.  It went straight to my work room from the truck. All it needed was the perfect colour.
 
 
I started by removing the hardware and giving the whole piece inside and out a good wash with some vinegar and water.
 
I mixed one part of this gorgeous blue paint with three parts of white and made up my chalky paint mixture.
 
I painted the inside with the lighter blue. Have I said how much I love this colour.  Once the inside was dry I gave the outside, including the chicken wire, a coat of the lighter blue as well.  It's easy to paint the wire. just be sure to use a very dry brush to keep it from clumping up and dripping.
Once it was completely dry, about an hour, I gave it a second coat of paint.  The main part was the light blue mix, but  the door and top were painted with the original darker blue.
 
I finished it with some natural colour paste wax. I always use  Minwax furniture wax but I think any paste wax would do.
 
I used it's original hardware because the detail was so perfect.


What do you think?  Isn't it beautiful? 


Using 3 parts white with one part of the original colour makes it easy to do any piece in a two tone like this.  There is never any worry that the colours won't be a perfect match.


This chalky paint takes the paste wax really well and buffs up to a nice soft shine.


This table didn't take long to find it's forever home.  I was a little sad to see it go, but  I imagine it being enjoyed for a few more generations instead of being landfill and that makes me happy.


I'd love to hear from you.
Please leave a comment and tell me
what you think of todays post.

Tuesday, November 25, 2014

Some Forgotten Roadside Treasure


I have a couple of vintage doors that are causing me quite a dilemma.  While returning from a trip to the city last fall, (yep, almost a year ago)  I spotted a pile of doors and windows on the curb with the word "Free" posted on a raged cardboard box.  And of course free is our favorite word right?  So of course I put as much as I could in my vehicle and brought it home. I wonder what people thought with old doors hanging out the back of my truck and the back door tied down with my hoodie.  Note to self: keep a length of rope in vehicle at all times.

What an incredible find.  There were four Solid wood doors, very old, very chippy and very beautiful.  Two of them even had the glass intact.
And a  motel style double headboard as well. It was a bit dirty but  it still had the cleat attached to the back for mounting it to the wall. 
There were a few windows too but unfortunately they were too rotten to use  


So here is my dilemma.  It's almost  a year later and I still haven't figured out what I am doing with the doors. If you have ever checked out vintage doors on pinterest you would understand my dilemma. There are just too many choices.


I have given the headboard a paint job so I can use it in my guest room when we finally get it done. The room will be used by my granddaughter more than anyone so I'm thinking the "Coral Reef" paint colour from yesterday's post for the walls (Once I strip that awful wallpaper of course)  and maybe some shabby accessories.
What do you think?


Back to the doors... I have been looking at projects made from old doors again recently  and am still undecided.  Here are a few of the pieces that I am inspired by. All I have to do is pick one ... Right?

http://bec4-beyondthepicketfence.blogspot.ca/2012/01/adooring-this-hall-tree.html
 
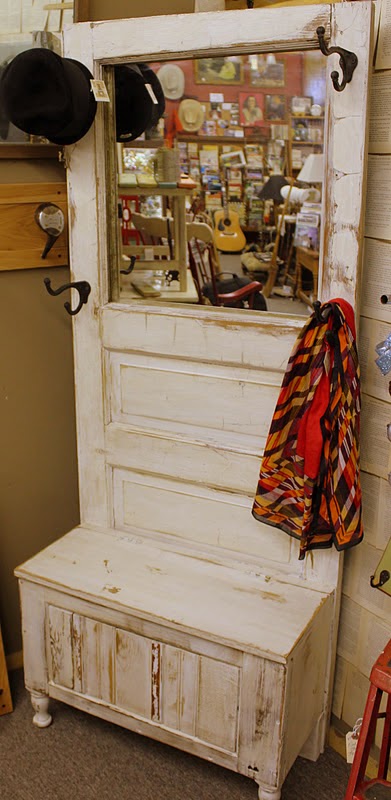
I love this Hall Tree from "Beyond the Picket Fence"  This blog is also one of my favorite places to spend a half hour with a cup of coffee.


This bookshelf is adorable. 


This one is an amazing piece of décor.


And  I'm in love with this beverage station from Finding Home


This is just a taste of why I can't decide.  Sometimes a piece will just tell you what it needs to be, but these doors are a bit wishy washy.  They keep changing their minds.
Check out the ton of possibilities on  Vintage Doors  on Pinterest .  Maybe you can point me in the right direction.


I'd love to hear from you.
Please leave a comment and tell me
what you think of todays post.


Monday, November 24, 2014

Paint Colour Decisions.

Picking paint colours is one of the hardest things I do.
Right now'm looking for paint colours for our home.  Searching for the perfect colour is harder than you might think.  We have lived here for over two years  now and I have not changed the colour of a single room.  That is about to change though.

I was looking online for this colour from Benjamin Moore called Revere Pewter  because I read a few really good reviews where it was pitched as the perfect gray.  And I must agree, it is pretty darn close to being such a perfect neutral.  I have paint chips all over my house trying to see how it goes with everything. 

While searching for the perfect gray I fell in love with this Guilford Green from Benjamin Moore .  It is Benjamin Moore's colour of the year for 2015 and I think it goes so good with the Revere Pewter.

I thought I'd look up a few other colour's of the year and this one is from Sherwin Williams.  It's called Coral Reef   and I don't think there is another colour out there that would go with my gray and green picks  quite so .  So there you have it . My colour picks for all the wall in my home.  Now I have to choose a white that will compliment them all. You will have to stay tuned though to see where I actually use them.  I promise to post pics when each room is done. 


I'd love to hear from you.
Please leave a comment and tell me
what you think of todays post.

Saturday, November 22, 2014

Baby Dresser

 
This dresser was a hot mess when I found it in the Thrift Store for $40. It had a beautiful waterfall front, but was  covered in scratches and scrapes and had grimy handles.  I wish I had taken a picture of the top.  You could tell it was used in a garage or workshop  for quite some time.
 
Even with all the mess,  I knew I had to rescue it and find it a good home.
 
 
I gave it a good cleaning with some TSP to remove any grease and grime.  Then it got a new paint job with a pretty green version of my own chalky paint.  There was no real damage on this piece, just a lot of wear and tear, so painting it was easy peasy
 
 
I painted the drawer fronts the same colour and even the back. (I'm not sure why I did the back but I was on a roll so it got done).

 
I couldn't find any new handles that were a nicer shape than these ones. I love how the curve mimics the waterfall shape on the front of the dresser. And they were a very heavy metal, so finding a set of the same quality would have cost a pretty penny.
You can tell from the ones on the left how absolutely grimy they were.  I scrubbed them really well with a paste I made of baking soda and peroxide to get the actual grease off them then I polished them by hand with a very fine sandpaper until they were smooth and had a satin like shine. By the time I was done they looked like  brushed brass.


I applied some clear paste wax to the dresser and drawer fronts and polished until I was happy with the finish. Then I used a sanding block to distress corners, edges and spots I thought would show natural wear.  I wanted this to have a bit of a shabby look. 


When I thought it had enough distressing,  I waxed it  one more time and added the hardware. 
 
Then  I was finished, but now I was madly in love with it, and didn't want to sell it. The dresser was the perfect height for a diaper changing station, so I knew it would make a great piece in a little girls room. Something that would carry her from baby to teen. 


Here's the dresser in it's forever home (the new owner sent me the picture) and I am so happy knowing this little girl will have this piece for years to come, and it didn't  end up hidden away in someone's garage.


I'd love to hear from you.
Please leave a comment and tell me
what you think of todays post.


Friday, November 21, 2014

Simple chalkboards

I always love when my grandkids come   to make something with me.  I feel like I'm passing the torch to a new generation. It's great when kids want to make their own things when they can just go buy them now.

Remember  tiled tray I did not to long ago. The tiles I used came from these boards that had nice smooth surface on the back and  a convenient handle too. They came from a décor store when the tile samples became outdated. And they were about 18" x 24" so a nice big surface to play with. I think tile companies change out their displays quite often to keep them current, so if you asked at your local store they might save some for you .


The girls always want to make chalkboards so of course a project was on.  
I didn't think to take pictures of the whole process because we were having a ton of fun,  plus treats and hot chocolate breaks and such.  After all it was just us girls.

All I did was pour out some DIY chalk board paint, (my same chalky recipe I always use mixed in a black paint) and  the girls painted  their own boards.  About 20 minutes drying time (insert snack here) and I used some painters tape to block  the border so they could paint   with their pick of my acrylic craters paint.  Then they painted inside the taped lines being ever so careful, and waited about 10 minutes and pulled off the tape.  In hindsight I think it would have been easier to leave it on a while so they could each decorate their own border stripe , but they did wonderfully any way.  Once they were completely dry, a few hours at least, I showed them how to prime their chalkboard by covering it with chalk completely and then rubbing it clean.. This fills in some of the rough areas and  prevents your board from being ruined by ghosting when you write on it.

I helped a bit with some of the lettering for the littlest one and for a bit of the cursive for the older girl ( she's not quite writing cursive yet but she's almost there) and when these two boards were done I had two very happy ladies. 


Congrats ladies on a job well done.  Now every time you use your board you can take a little moment to feel the pride of creating something of your own.
I hope you enjoy them for a long time because I will enjoy the memory of our day together making them. 
 
Here is the mix I use for my DIY Chalky Paint:
1 cup of latex or acrylic paint.  (do not use paint and primer in one)
1/3 cup of Plaster of Paris ( found at any hardware store)
1/3 cup of water.
Mix Plaster Of Paris and water, and then add to paint.  mix well.  I shake mine in the jar I mix it in
 
 
I'd love to hear from you.
Please leave a comment and tell me
what you think of todays post.

Thursday, November 20, 2014

Vintage Ladies Writing Desk

 
Isn't this little set absolutely adorable. 
 
 
I purchased this beautiful ladies desk at a yard sale and thought it was one of the nicest pieces I had come across since I started collecting projects.  Even with its terrible orange , yellow and brown flower   print seat,  and with one of the back cross pieces in the chair broken  it was a bargain at $20. 

I found a label on the bottom that said it was from a furniture place right here in Ontario in the early 1900's, and that made it even more appealing to me.

Normally with a piece of furniture of good quality I would try to refinish, but this one needed some wood filler and that doesn't take stain very well.  So I decided to paint.  This is the first piece of furniture I ever painted using my own mix of chalky paint.  I know everyone's recipe is a little different, but this is the one I use.  I can't remember where I found it but I googled it of course.
I mix 1/2 cup of Plaster of Paris into 1/2 cup of warm water. 
I add to this mix 1 + 1/2 cups of regular latex paint. 
I have found any brand of paint works but don't use the paint with primer combo. What I love about it?...it covers any surface and you don't need to sand and prime first.  yay


The desk and chair I painted 2 coats with this pretty blue I had on hand, and let it dry really well. Then I used a sand block to lightly distress the corners and edges, and where I thought it might wear naturally.  I just wanted to give it a pretty shabby chic look. Then I finished both pieces with a natural colour paste wax for furniture.  This rubs on over the chalky paint so easily and when almost dry it buffs to such a pretty shine.  As a protective finish this is very good.  I love it because if some time down the road your piece needs a touch up it is very easy to rewax and buff.


Then I had to tackle the awful dated seat. 


I looked for a small remnant that I could use ,this blue print was as close as I could find at the time.

Overall I like how it turned out, but I'm still not sure of the upholstery.  I might look for something a little different.  What do you think?

I'd love to hear from you.
Please leave a comment and tell me
what you think of todays post.

Tuesday, November 18, 2014

The perfect pair of Chairs.

Aren't these chairs pretty. elegant.
This is the first time I've done over a pair of matching chairs and I must say I am really happy how they turned out.


And this is what they looked like when I got them.  You can see why I'm so pleased with the end result. 


I removed the seats and gave both chairs 2 coats of my own chalky paint. This colour was a mixing mistake at the hardware store.  What I call oops paint.  I always check whenever I'm in any paint department to see if they have any of these mistakes.  Often I can find colours I like for very cheap. This is definitely one of those colours. It's almost the colour of graphite. When the paint was completely dry I finished them off with a coat of dark furniture wax.


The seats were recovered in this great fabric. I love the pattern.  I actually recovered one seat twice.  The first time I did them I didn't match the pattern on both chairs and didn't like that they weren't the same. 


So I redid the second one to match and am really glad I did.


I like that these chairs will look just as nice in a bedroom or living room and can be used as extra seating in the dining room for those big family meals.
 Where would you put these if they were in your home?
 
 
I'd love to hear from you.
Please leave a comment and tell me
what you think of todays post.


Monday, November 17, 2014

Serving Tray makeover


Vintage tray and tiles
 
I love how this little serving tray turned out. Much better than when I purchased it at our local Thrift Store about a year ago.
 
 
Vintage tray from thrift store
 
It had these little hand painted flowers that someone had lovingly done.. probably in the 70's. It was  loved once but the romance was definitely over. 


Vintage tray
 
I gave it a good cleaning and put a liner in the bottom just so I could use it in my coffee station, but I really wasn't lovin' it. 


Tile store displays
  
Then last week I was gifted a bunch of Tile sample boards from the flooring section of a hardware store. When they arrived I just happened to lean them down beside the hated serving tray and WOW it was love at first sight.  It just happens that way some times.  A piece will just scream at you, telling you what it needs. Well this little tray needed these tiles. You can tell it didn't want the ones pictured above though..  I forgot to take a before pic of the tile boards. :(
I got busy and pried off all the tiles from the boards that I wanted to use, and then I removed all the mesh backing and glue from the tiles.


Vintage tray freshly painted
 
Once I had all the tiles cleaned off   I gave the tray a couple of coats of my own chalky paint mixture in this great graphite colour.  It already looks tons better.  While the paint was drying I sorted the tiles and dry fitted them all together so I could play with the arrangement...  My dear hubby had some tile glue (Installing tile is what he does after all) and I glued all the tiles into the tray.


Vintage tray with glass tiles
 
I used a combination of four different sizes of tile in a mix of textures and colours.  Samples are great for this because of their variety.  There were some glass tiles along with porcelain, marble and slate.
I think I should have bought a lottery ticket that day because the tiles fit in this tray very tight and I didn't have to make a single cut.  I did however spend a bit of time playing with the arrangement to find the right tiles to make the fit. Cutting may have been faster.


Beautiful vintage tray
 
I Love how this turned out.  The tiles are fitted so tight that I don't have to use any grout to fill in the spaces.  Hubby says I still can if I change my mind but I don't think it's necessary.  I would make a dozen of these trays if I could, but it's nice knowing it's a one of a kind piece.
I imagine myself curled up in a big chair by the fire, and this tray on a little table near by holding my favorite book and a cup of hot coffee.  How about you?


I'd love to hear from you.
Please leave a comment and tell me
what you think of todays post